Integrating GitBlit with Directory Server
July 12, 2016
I did describe how to turn your DiskStation into a self-hosted Git server in the past, but I wanted to push things a little further and so I started experimenting with DSM’s Directory Server. Read along to find out how to manage users in Directory Server and set it up as authentication provider for GitBlit.
Why the effort?
My main reason for setting up Gitblit was to be able to collaborate with friends on projects we don’t want to publicly host on GitHub. By using something like Gitblit instead of following Synology’s suggestion to manually create server repositories with git init --bare , I gained one important advantage: I do not need to create a full fledged user account on my DiskStation to allow someone access to my git repositories. To me this is important from a security point of view. If I create a DSM user for every single person I want to give access to a git repository, I also need to ensure that I basically take away all privileges from these user accounts. I don’t want them to be able to log in to DSM in the first place so Gitblit having its own user management is a big plus. However I also run Jenkins on my DiskStation. This made me think about Directory Server as an opportunity to manage non DSM users on my DiskStation and allow my collaborators to access both Gitblit and Jenkins (and potentially more applications) with one username and password.
Setting up Directory Server
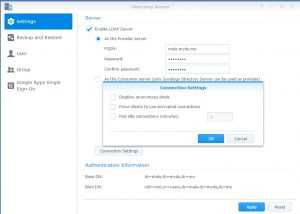
So to get started we setup Directory Server by following these steps:
- Install Directory Server from DSM Package Center
- Launch Directory Server to bring up the Directory Server settings screen
- Check the box reading “Enable LDAP Server”
- Check the “As the Provider server” radio button
- Specify the domain name for the LDAP database in the FQDN field
- Setup a password
- Check the connection settings to ensure you allow anonymous binds
Your settings should look similar to the ones in the screenshot. [caption id=“attachment_317” align=“aligncenter” width=“300”]
 Directory Server setup[/caption] For a complete explanation of Directory Server settings have a look at Synology’s documentation. Now that the server is setup, we can add our users by following these steps:
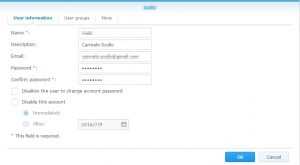
- Switch to the “User” Tab
- Click “Create”
- Fill in all fields in “User information”, where “Name” is the username used for login and “Description” can be used for user’s full name
- Add your new user to the “users” group and click “OK”
Your user should look something like the one in the screenshot. [caption id=“attachment_324” align=“aligncenter” width=“300”]
 Directory Server user[/caption] We’re done with Directory Server setup. Let’s now learn how to configure Gitblit to use our Directory Server as authentication provider so we can log in with the Directory Server user we just created.
Integrating with Gitblit
One of Gitblit’s features is to connect to an LDAP server and use it as an authentication provider. You can find documentation for this here. Most of the LDAP setup is pretty straight forward and is performed through the gitblit.properties file. You can find gitblit.properties in Gitblit’s baseFolder . For me this is /volume1/@appstore/gitblit , because I configured Gitblit to use that as a custom baseFolder by specifying it as environment variable in Tomcat’s context.xml file, as described here. So to configure Gitblit to anonymously bind to Directory Server I added the following settings to gitblit.properties : [code lang=text] realm.authenticationProviders = ldap realm.ldap.server = ldap://localhost:389 realm.ldap.username = realm.ldap.password = realm.ldap.accountBase = dc=melo,dc=myds,dc=me realm.ldap.accountPattern = (&(objectclass=inetorgperson)(cn=${username})) realm.ldap.displayName = gecos realm.ldap.email = mail [/code] This tells Gitblit to use an LDAP server as authentication provider, the address of the LDAP server and - since we allow anonymous binds - to use empty username and password to let Gitblit bind to our Directory Server. Gitblit comes with a default.properties file (described here) that gets included in gitblit.properties and because the default.properties file has default values for username and password providing the realm.ldap.username and realm.ldap.password with an empty value is mandatory to anonymously bind to our Directory Server. For realm.ldap.accountBase you need to provide the value called “Base DN” in Directory Server’s settings screen. For me this is dc=melo,dc=myds,dc=me , like you can see in the screenshot. The values for the remaining settings were a bit tricky. To understand what I need to configure I connected to the DiskStation by ssh as admin and executed the following command: [code lang=bash] ldapsearch -D uid=root,cn=users,dc=melo,dc=myds,dc=me -w <redacted_password> -b dc=melo,dc=myds,dc=me [/code] This binds to the Directory Server, searches all objects and displays a rather verbose output. Among lots of other details the output has the following information: [code lang=text] objectClass: inetOrgPerson cn: <redacted_username> gecos: Carmelo Scollo mail: <redacted_email> [/code] Remember how I suggested to use the “Description” field for the user’s full name when creating the user in Directory Server? The ldapsearch output informs us that internally the field is called gecos , so that is what we define as realm.ldap.displayName . It also tells us that the email is stored in a field called mail , which we need to consider, because Gitblit’s default.properties assume that the field is called email, so we set realm.ldap.email = mail . The default accountPattern would be (&(objectClass=person)(sAMAccountName=${username})) , but the ldapsearch output shows that our user object is objectClass:inetOrgPerson and the field for the username is cn , which leads us to realm.ldap.accountPattern = (&(objectclass=inetorgperson)(cn=${username})) So that is the complete Gitblit configuration required for using our Directory Server as authentication provider and thus allowing us to connect to Gitblit with Directory Server users. Just restart Gitblit for the configuration changes to take effect and log in with a user that exists in Directory Server!
Password change self-service
Since Directory Server requires us to provide a password when creating a user, we need to provide our users a way to change the initial password we set for them during user-creation. The easiest solution for me to get password change self-service in place was by using a php based solution from GitHub user Matt Rude found here. So I grabbed that php file, edited the $dn variable to match my base dn and put it in a directory inside my web folder. Then I added an .htaccess file to the same path that rewrites all http requests to that resource to https like this: [code lang=text] RewriteEngine On RewriteCond %{HTTPS} !on RewriteRule (.*) https://%{HTTP\_HOST}%{REQUEST\_URI} [/code] Last step was to make sure that the ldap php extension is enabled. You can do this by going to Control Panel -> Web Services -> PHP Settings -> Extensions and check the box for ldap. Now I can point my users to the URL for this php form where they provide their username and initial password and define a new password.
Conclusion
The users I create in Directory Server can now be used to log in to my Gitblit server. Thanks to the php solution from GitHub user Matt Rude I have a password change self-service in place. I was able to configure Jenkins to use the Directory Server for authenticating users, too. This way I got a central user management that is independent of DSM users, which is exactly what I wanted!